快速上手前端框架layui
前端 / 管理员 发布于 5年前 570
layui(谐音:类UI) 是一款采用自身模块规范编写的前端 UI 框架,遵循原生 HTML/CSS/JS 的书写与组织形式,门槛极低,拿来即用。

一、介绍
在使用layui之前,我们先要了解一下layui是什么?
我觉得用作者贤心的一句话来概括就好了:为后端程序员设计的前端框架。
更加详细的描述是:这是一个封装了各种css和js、Ajax等等的前端框架,其封装程度之高,有时甚至对程序员来说不大友好。但对于前端技术一般的人来说,layui不失为一个好的工具。
二、开始使用layui
使用方式:下载后导入项目,然后引用即可
<script th:src="@{/jquery-3.3.1.min.js}"></script><script th:src="@{/layui/layui.js}"></script><link rel="stylesheet" th:href="@{/layui/css/layui.css}" />先要引用jquery,然后再引用layui.js和layui.css。
为什么一定要本地呢?没有CDN?
上面说了,layui封装得太“好”了,程序员的自主性受到限制,这个时候需要修改layui的源码,比如css的样式——这也是layui的正确用法,而不只是简单地使用。
layui的模块:layui是模块化的,包括form,layer,laydate,laypage等等模块,正是这些模块组成了完整的layui。使用layui的时候,需要指明自己使用的模块。
开始使用layui:
<script> layui.use(['mod1', 'mod2'],function(args){ var mo1 = layui.mod1 ,mo2 = layui.mod2; });</script>三、layui表单
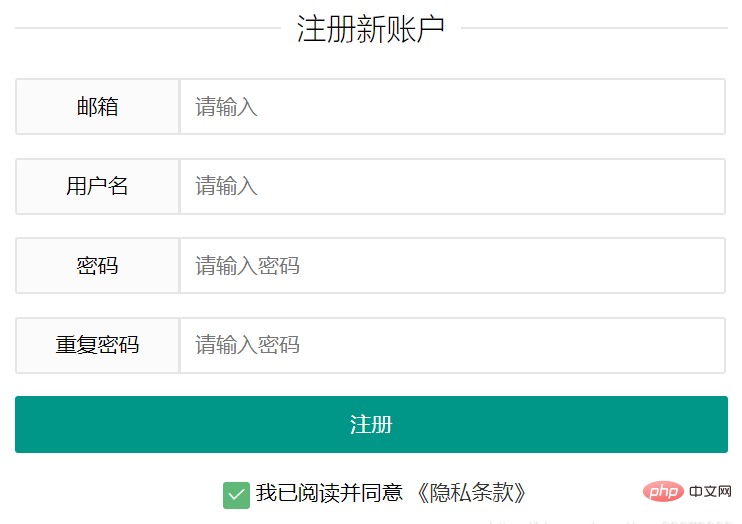
下面以HTML中最常见的form表单来演示layui的使用。
html部分:
<fieldset class="layui-elem-field layui-field-title" style="margin-top:30px;"> <legend style="text-align:center;">注册新账户</legend></fieldset><form id="reform" class="layui-form layui-form-pane" th:action="@{/user/register.html}" method="POST"> <div class="layui-form-item"> <label class="layui-form-label">邮箱</label> <div class="layui-input-block"> <input type="text" name="email" lay-verify="email" placeholder="请输入" autocomplete="off" class="layui-input" /> </div> </div> <div class="layui-form-item"> <label class="layui-form-label">用户名</label> <div class="layui-input-block"> <input type="text" name="name" lay-verify="required" placeholder="请输入" autocomplete="off" class="layui-input" /> </div> </div> <div class="layui-form-item"> <label class="layui-form-label">密码</label> <div class="layui-input-block"> <input type="password" name="password" lay-verify="pass" placeholder="请输入密码" autocomplete="off" class="layui-input" /> </div> </div> <div class="layui-form-item"> <label class="layui-form-label">重复密码</label> <div class="layui-input-block"> <input type="password" name="repassword" lay-verify="repass" placeholder="请输入密码" autocomplete="off" class="layui-input" /> </div> </div> <div class="layui-form-item"> <button class="layui-btn layui-btn-fluid" lay-submit="" lay-filter="demo1">注册</button> </div> <div style="text-align:center;margin-top:15px;"> <input type="checkbox" name="agree" lay-skin="primary" checked=""/> 我已阅读并同意 <a href="#" id="agreementLink">《隐私条款》</a> </div></form>javscript部分:
<!-- js for form input and submit --><script>layui.use(['form'], function(){ var form = layui.form; //自定义验证规则 form.verify({ pass: [/(.+){6,12}$/, '密码必须6到12位'] ,repass:function(value){ var pvalue = $("input[name='password']").val(); if(pvalue!=value){ return "两次输入的密码不一致"; } } }); //监听提交 form.on('submit(demo1)', function(data){var agreeChecked = data.field.agree; if(agreeChecked!="on"){ msg("未同意隐私条款"); return false;//阻止表单提交 } });});</script>效果图:

四、layui弹出层
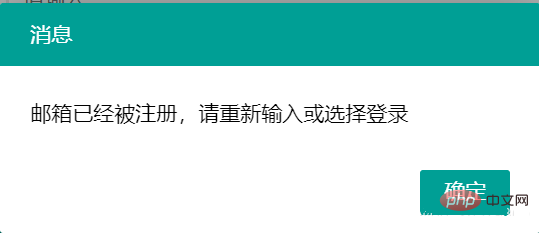
下面讲述一下弹出层,弹出可以说是一个很常见的东西了,但基础的HTML/JS只有丑陋的alert("")方法,layui包含了一个叫做layer的弹出层模块。
使用layer的两种方式:
一、像上面使用form模块一样,layui.use声明,然后在use后面的function里使用;
二、导入独立的layer模块文件,然后就可以直接使用;
关于第一种方式不予讨论,这里介绍一下第二种方式。
首先,从layer官网下载layer的文件,解压并放入自己的项目下,然后<script th:src="@{/layer/layer.js}"></script>类似这样的形式引入layer.js文件。
Example:
function msg(msg){ //墨绿深蓝风 layer.alert(msg, { title:'消息' ,skin: 'layui-layer-molv' //样式类名 ,closeBtn: 0 },function(index){layer.close(index);//关闭 });}效果图:

layer不仅仅可以弹出提示框,还可以做到一些有趣且实用的动态效果,甚至可以加载一个弹出的HTML界面出来。
五、layui文件上传
下面介绍一下layui的文件上传,即upload模块
<!-- 上传图片--><div class="layui-tab-item"> <div class="layui-upload"> <button type="button" class="layui-btn layui-btn-normal" id="headButton"> <i class="layui-icon"></i>选择图片 </button> <button type="button" class="layui-btn" id="headAddButton">开始上传</button> </div> <div class="layui-inline layui-word-aux" style="margin-top:20px;"> <label>注意:支持jpg,png和gif格式,文件大小应小于10MB</label> </div></div>
<!-- 文件上传 --><script>layui.use('upload',function(){var $ = layui.jquery,upload = layui.upload;//选完文件后不自动上传upload.render({elem: '#headButton',url: getRootPath()+'/user/uploadPicture',size: 10*1024 //10*1024KB = 10MB,accept: 'images',acceptMime: 'image/jpg,image/png,image/gif',auto: false,bindAction: '#headAddButton',done: function(res){msg(res.msg);//刷新头像地址var resUrl = res.url;if(resUrl!=""){document.getElementById("userImg").src=getRootPath()+ resUrl;}}});});</script>后端(java-spring-controller类中):
@AutowiredFileService fileService;@RequestMapping(path="/uploadPicture",method= {RequestMethod.POST})@ResponseBodypublic Map<String,Object> uploadFile(@RequestParam("file")MultipartFile file,HttpServletRequest request){Map<String,Object> map = new HashMap<String,Object>();String path = fileService.uploadImg(file, "head");//service层保存文件//返回值,必须按照这样写——要符合upload模块的回调接口才行map.put("code", 0); //0表示成功map.put("msg","上传成功");map.put("data", "");map.put("url", path);return map;}upload上传接口和返回值:
//上传接口upload.render({ elem: '#id' ,url: '/api/upload/' //必填项 ,method: '' //可选项。HTTP类型,默认post ,data: {} //可选项。额外的参数,如:{id: 123, abc: 'xxx'}}); //返回值{ "code": 0 ,"msg": "" ,"data": { "src": "http://cdn.layui.com/123.jpg" }}效果图:

layui的upload模块能够在前端进行配置文件大小、格式、预览,还可以做到批量上传、重传功能。
六、layui分页
在网站中也经常会用到分页,后端的分页是容易实现的,但对于前端来说就不是那么理想了。layui提供了自己的分页模块——laypage。
<div id="allNewsDiv"></div><div id="demo"></div>
layui.use(['element','laypage'], function(){ var element = layui.element ,laypage = layui.laypage; $.ajax({ url:getRootPath()+'/news/count' ,type:'GET' ,async:true //false表示非异步,即同步,即请求处理完毕后才能返回; ,data:{"page":1, "limit":10} ,dataType:'json' ,success:function(alldata){var numbers = alldata.count; //总页数大于页码总数laypage.render({ elem: 'demo' ,count: numbers//数据总数 ,first: '首页' ,last: '尾页' ,jump: function(obj){ $.ajax({ url:getRootPath()+'/news/list' ,type:'GET' ,async:true ,data:{"page":obj.curr, "limit":obj.limit} ,dataType:'json' ,success:function(data){ var shtml = getNewsContentHTML(data);//js处理数据并填充div document.getElementById("allNewsDiv").innerHTML=shtml; } }); } }); } });});如上,分页跳转的事件是在jump中进行的,在里面编写AJAX请求,通过jump的obj参数获得page和limit参数,然后在请求执行完毕并返回数据后进行处理即可。
七、layui数据表格
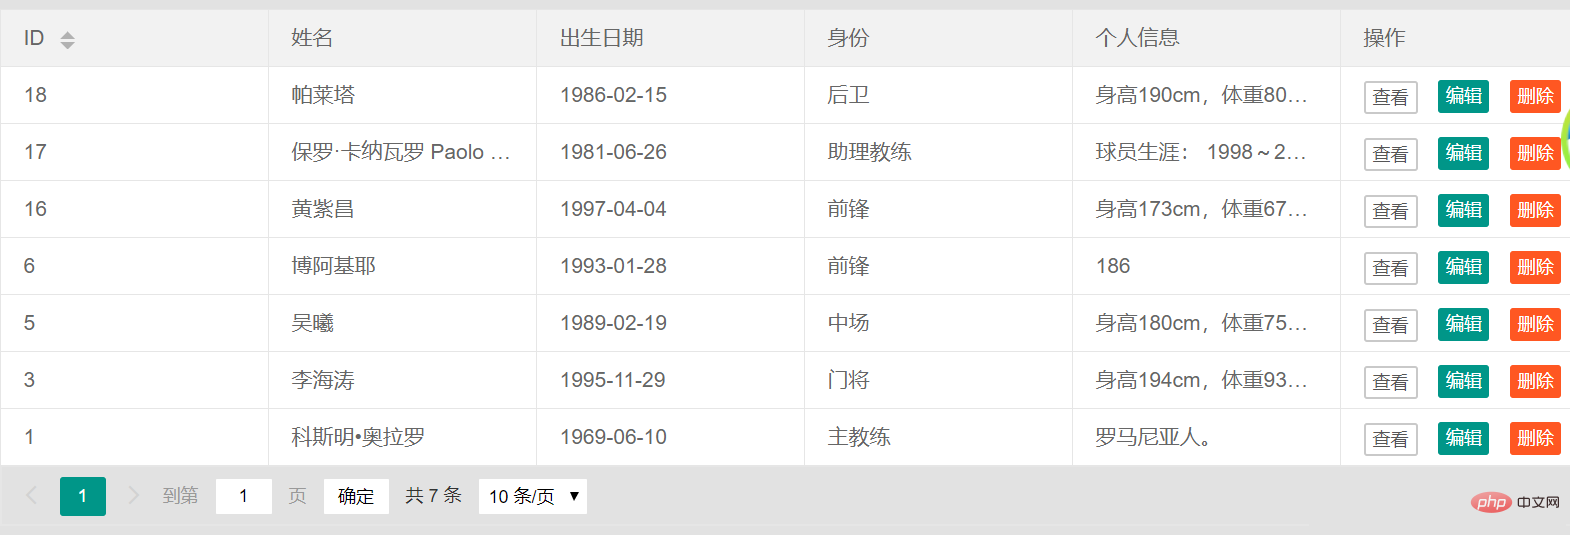
表格时常见的功能,但js拼接HTML表格算是一件比较繁琐且容易出错的事情。
<!-- team分页table --><table class="layui-hide" id="teamTable" lay-filter="teamTool"></table>
<script>layui.use('table',function(){ var table = layui.table;//模块声明table.render({elem:'#teamTable',method:'get',url:getRootPath()+'/team/admin/list' //返回一个List<TeamMember>的list,cellMinWidth:80,cols:[[{field:'id', title:'ID', sort:true},{field:'name', title:'姓名'},{field:'birth', title:'出生日期'} //这里的templet值时模板元素的选择器,{field:'position', title:'身份'},{field:'information', title:'个人信息'} ,{field:'right', title:'操作', toolbar:'#barDemo'} ]] ,page:true //开启分页 });//监听工具条table.on('tool(teamTool)', function(obj){ //注:tool是工具条事件名,test是table原始容器的属性 lay-filter="对应的值" var data = obj.data; //获得当前行数据 var layEvent = obj.event; //获得 lay-event 对应的值(也可以是表头的 event 参数对应的值) var tr = obj.tr; //获得当前行 tr 的DOM对象 console.log("id:"+data.id); if(layEvent === 'detail'){ //查看 //do somethinglayer.msg('ID:'+ data.id + ' 的查看操 } else if(layEvent === 'del'){ //删除 layer.confirm('确认删除人员信息?', function(index){ //do something layer.close(index); }); } else if(layEvent === 'edit'){ //编辑 //do something }});});</script> <!-- tools --><script type="text/html" id="barDemo"> <a class="layui-btn layui-btn-primary layui-btn-xs" lay-event="detail">查看</a> <a class="layui-btn layui-btn-xs" lay-event="edit">编辑</a> <a class="layui-btn layui-btn-danger layui-btn-xs" lay-event="del">删除</a></script>效果图:

更多layui知识请关注layui框架。
以上就是快速上手前端框架layui的详细内容,更多请关注其它相关文章!
上一条:
Python django搭建layui提交表单,表格,图标的实例
下一条:
Layui使用入门教程
- 相关文章
- 使用 Alpine.js 排序插件对元素进行排序(0个评论)
- 在js中使用jszip + file-saver实现批量下载OSS文件功能示例(0个评论)
- 在vue中实现父页面按钮显示子组件中的el-dialog效果(0个评论)
- 使用mock-server实现模拟接口对接流程步骤(0个评论)
- vue项目打包程序实现把项目打包成一个exe可执行程序(0个评论)
- 近期文章
- 在go语言中实现字符串可逆性压缩及解压缩功能(0个评论)
- 使用go + gin + jwt + qrcode实现网站生成登录二维码在app中扫码登录功能(0个评论)
- 在windows10中升级go版本至1.24后LiteIDE的Ctrl+左击无法跳转问题解决方案(0个评论)
- 智能合约Solidity学习CryptoZombie第四课:僵尸作战系统(0个评论)
- 智能合约Solidity学习CryptoZombie第三课:组建僵尸军队(高级Solidity理论)(0个评论)
- 智能合约Solidity学习CryptoZombie第二课:让你的僵尸猎食(0个评论)
- 智能合约Solidity学习CryptoZombie第一课:生成一只你的僵尸(0个评论)
- 在go中实现一个常用的先进先出的缓存淘汰算法示例代码(0个评论)
- 在go+gin中使用"github.com/skip2/go-qrcode"实现url转二维码功能(0个评论)
- 在go语言中使用api.geonames.org接口实现根据国际邮政编码获取地址信息功能(1个评论)
- 近期评论
-
122 在
学历:一种延缓就业设计,生活需求下的权衡之选中评论 工作几年后,报名考研了,到现在还没认真学习备考,迷茫中。作为一名北漂互联网打工人.. -
123 在
Clash for Windows作者删库跑路了,github已404中评论 按理说只要你在国内,所有的流量进出都在监控范围内,不管你怎么隐藏也没用,想搞你分.. -
原梓番博客 在
在Laravel框架中使用模型Model分表最简单的方法中评论 好久好久都没看友情链接申请了,今天刚看,已经添加。.. -
博主 在
佛跳墙vpn软件不会用?上不了网?佛跳墙vpn常见问题以及解决办法中评论 @1111老铁这个不行了,可以看看近期评论的其他文章.. -
1111 在
佛跳墙vpn软件不会用?上不了网?佛跳墙vpn常见问题以及解决办法中评论 网站不能打开,博主百忙中能否发个APP下载链接,佛跳墙或极光..
Copyright·© 2019 侯体宗版权所有·
粤ICP备20027696号

